The Art of Combining Flavours and Strength
Last year, I decided to dive into the world of grafting tomatoes, eager to blend the best qualities of different varieties. With a passion for gardening and a bit of curiosity, I chose Alicante for its exceptional flavour and Estamino for its sturdy roots. Little did I know that this hands-on experience would not only enhance my garden but also deepen my appreciation for the art of growing tomatoes. Join me as I walk you through what I did.
If you’re looking to elevate your home gardening game, grafting tomatoes is a fantastic technique to explore. Not only does it allow you to combine the best traits of two different varieties, but it also gives you the chance to experiment with flavours and resilience. In this guide, we’ll delve into the essentials of grafting, focusing on the popular Alicante variety for its delicious fruit and Estamino for its sturdy root system.
So, what exactly is grafting? At its core, grafting is a method that involves joining two plants together so they grow as one. The top part of the graft, known as the **scion**, is where the desired fruit variety comes from—in this case, Alicante. The bottom part is the **rootstock**, which provides the roots and is often selected for its hardiness or resistance to diseases. By combining these two, you can create a plant that boasts the fantastic flavour of Alicante tomatoes while benefiting from the robust nature of Estamino roots.
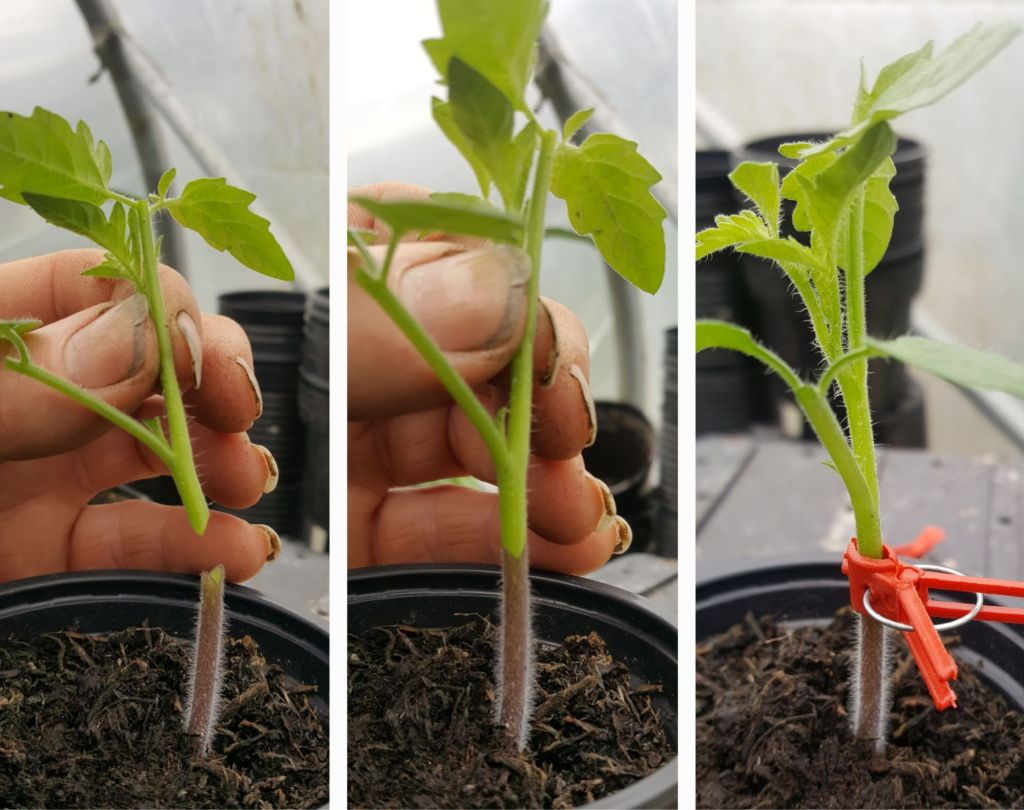
Begin by selecting a strong Estamino plant, about 10 to 15 cm tall. Using your knife, make a clean cut V, about 5 cm above the soil line. This cut should be smooth, as it encourages healing. Next, turn your attention to the Alicante variety. Look for a stem that matches the rootstock’s thickness and cut it at the same angle. Aim for a length of about 5 to 10 cm, ensuring you have a couple of leaf nodes.
With your scion and rootstock prepared, it’s time to join them together. Align the cut surfaces so they’re touching; this is vital for the graft to take. Secure the graft using a grafting clip or tape—make sure it’s tight enough to hold them in place. If you want to give your graft the best chance, consider placing a plastic bag or humidity dome over it to maintain moisture. If you’re doing multiple grafts, don’t forget to label them to avoid confusion later on!
After you’ve set everything up, place your grafted plants in a warm, sheltered spot but keep them out of direct sunlight for a little while. This helps reduce stress on the graft. Within a week or so, check the graft site for signs of new growth. If you see some, congratulations! Your graft has taken. After about two to three weeks, you can gently remove the grafting clips or tape.
Once your grafted plants are looking strong and have a few leaves, they’re ready to be transplanted into larger pots or directly into your garden. Watching them grow and produce delicious Alicante tomatoes, all thanks to the sturdy roots of Estamino, is incredibly rewarding.
As with any gardening technique, a bit of patience and observation goes a long way. Grafting is an art that takes practice, but the rewards—vibrant, healthy tomatoes with fantastic flavour—are well worth the effort. So why not give it a go? Happy grafting, and may your garden thrive

Your support makes a difference in my life and helps me create more of what you like. Thank you!

- Darkness, Power and Beauty
 Horse’s steady gazeStrengthful eyes that dare to meetChallenge accepted Courage is the strength to face… Read more: Darkness, Power and Beauty

Leave a comment